Hobby Distillers Club
60 Gallon Copper Distiller Kit "YOU SOLDER" EZ Kit
60 Gallon Copper Distiller Kit "YOU SOLDER" EZ Kit
Regular price
$ 799.00 USD
Regular price
$ 999.00 USD
Sale price
$ 799.00 USD
Unit price
per
Couldn't load pickup availability
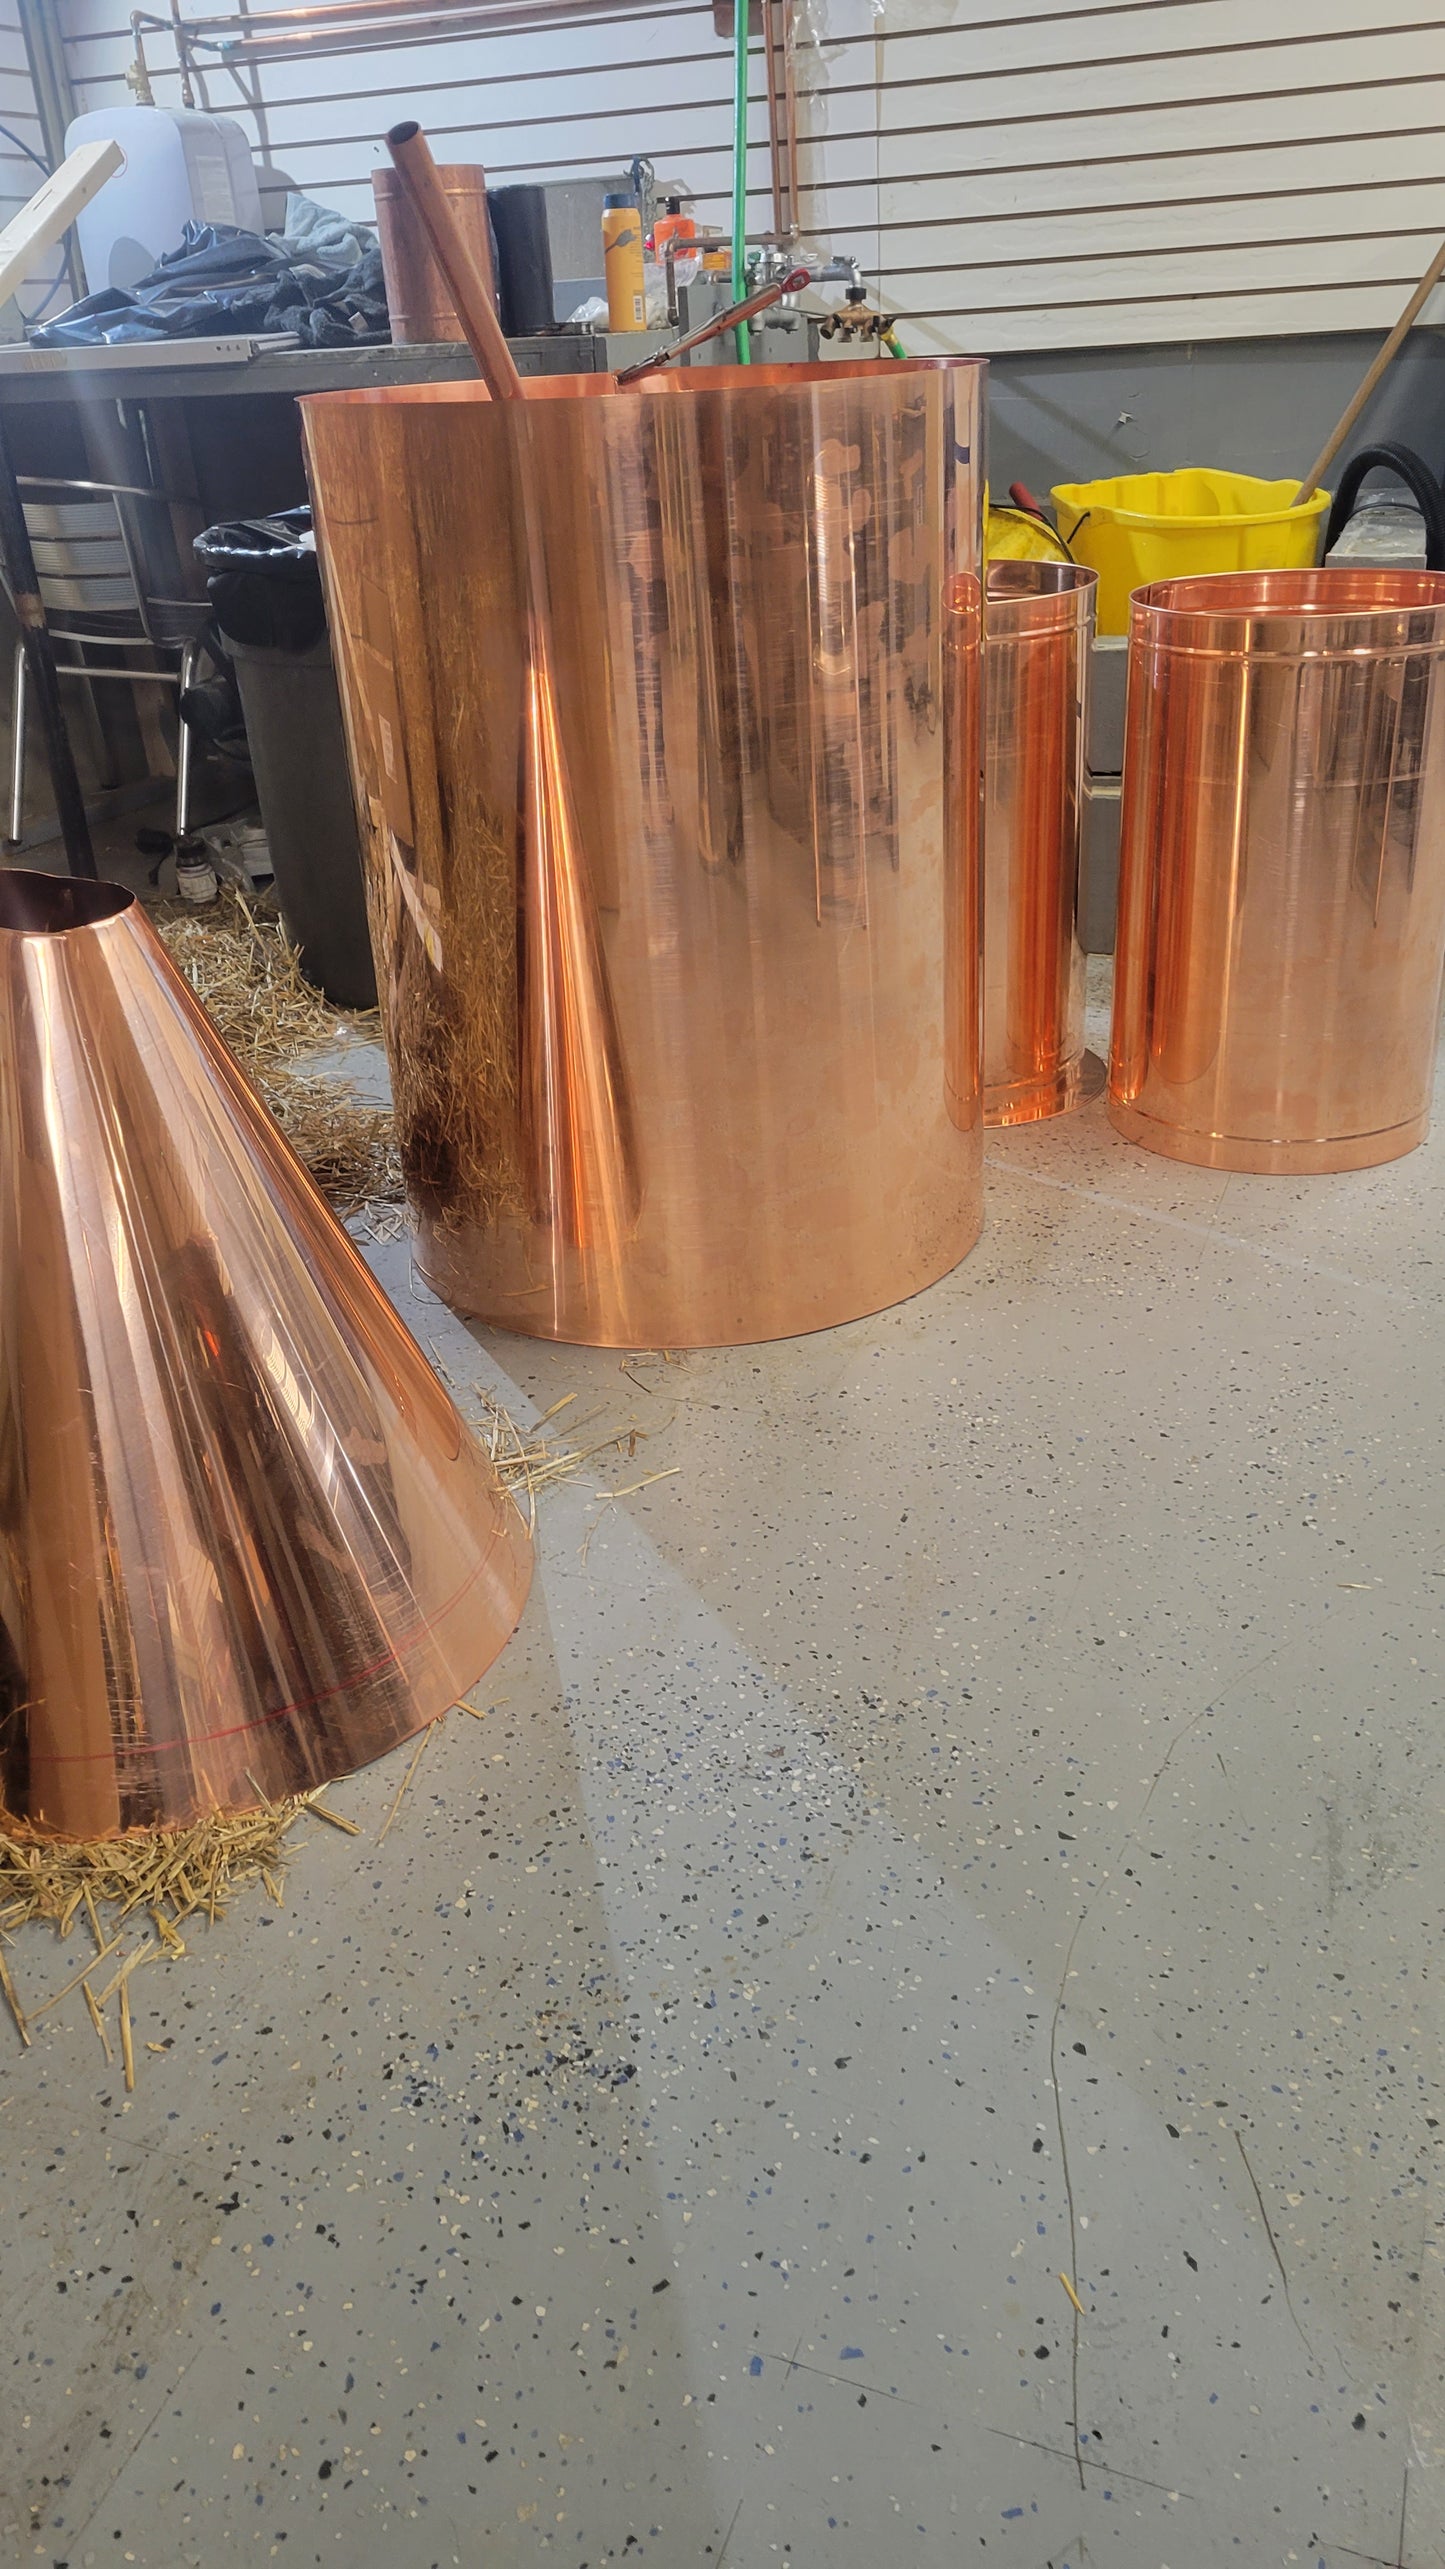
60 Gallon Copper Distiller Kit "YOU SOLDER" EZ Kit
60 Gallon Capacity Pot
15 Gallon Thumper
15 Gallon Worm
1/2" Coil
You Solder EZ Kit - Comes with all of the fittings, pipe, solder, flux and MORE!!
A do-it-yourself kit (DIY) is a copper moonshine kit manufactured by Hobby Distillers Club. A DIY Kit is 20 oz. Sheet copper which is cut, bent, rolled and in embossed which leaves it ready to solder. Clamping and Soldering of the pieces is what is needed to complete the moonshine still.
This is not a project where you just solder the tubing pieces and you're done. This is a project that will take at least 4 to 8 hours to complete. When we get the copper in our shop, we measure it, cut it, bend it, roll it into a cylinder shape, emboss it and ship it to the customer ready to clamp and solder.
We include the flux and solder in the box as well as all the parts and fittings that you need to finish the unit. We do not include the propane tank the torch head for the propane tank.
You can save a bunch of money with our moonshine kits. We specialize in 2 gallon kits all the way up to 100 gallon moonshine kits where the customer can actually save themselves hundreds of dollars.
Once again this project is not easy. We estimate that it will take the average customer 4 to 8 hours to clamp and solder and complete the unit. You can check out our video on www.moonshinekits.com which is a 36 minute tutorial video as well as you can check out "KitBookLet) Which is an instruction booklet built for our customers. Thank you for being a part of Hobby Distillers Club.
You Solder BOOKITLET: A step by step guide on how to make moonshine still out of of our moonshine kits for sale

INTRODUCTION
Are you up for a challenge?
The EZ KIT you just purchased comes with a challenge; this is not a kit for amateurs, but for the “DIY” kind of guy or girl.
Assembling the EZ KIT is not easy; you have to attach, clamp and solder each piece yourself. We have already cut, bent, rolled and embossed the copper for you to get you started.
Now it’s up to you to rise up to the challenge.
How rewarding would it be to be able to BRAG to all your friends and family that you actually built a Copper Moonshine Still yourself! Or better yet, build it with the help of a friend or family member as a quality time project.
We included this BooKitLet (yeah, that’s what we called this awesome thing) with very detailed instructions on how to get your Still ready to rock. How- ever you decide to tackle this, we promise you that you will not be alone along the way, we are just a phone call away if you have questions!
1-(603) 997-6786
So, turn to the page with a list of Tools Needed and get ready to build your own Copper Moonshine Still!
Good Luck Moonshine Kit Rockstar.
KITS INSTRUCTIONS
PARTS INCLUDED:


TOOLS NEEDED
* Gloves and eye goggles
* Metal Snips for Custom Cuts
* Small Ball Hammer
* Metal File for Sharp Edges
* Propane Torch Head
* Propane tank (small, disposable)
* Fire Extinguisher and other safety supplies
* Long Flat Head Screwdriver
* Step Drill Bit
* Deburring Tool (if needed)
* Anything made of metal to hold up the bottom of the pot from the inside Or a 5 Gallon bucket lined with tin foil
(to hold circle bottom piece into place when fitting it)
* Clamps to hold the seams together when soldering (Have different length sizes on hand)
* Tin Foil
Pot Body Assembly
The Pot has two sides of the seam: a sharp side and a tucked seam side.
The Sharp side goes on the inside of the pot, it tucks under the folded over side.

Apply flux to the sharp seam on the outside and to the folded over side to the inside (the flux sides will touch when you fold them over). Clamp the seams together on the folded over seam.

Our mission here is to clamp the pot to the correct size of the bottom circle.
Clamp the pot so the circle fits snug, you want it on the tighter side rather than loose. This is important, please remember copper is soft and you will want it tight, so the solder makes a connection.
Start soldering inside the pot seams. Use the heat and follow with the solder, you’ll heat up the copper to melt the solder.
Go slow, making sure the solder drips into the gaps of the seam. Your first run of soldering is to fill the gaps, you will do a second run along the seam to make it look good.
Insert the pot circle and use something to push the circle up from the inside, as to keep it in place while you solder the circle. Same as with the pot seams solder slowly; making sure there are no gaps, circle has to be snug.
Let it Cool and take the clamps off.
Thumper comes with two copper circles. One of these circles has two drilled holes; this one is the top circle. Same as the pot, insert bottom circle and solder.
Turn over and insert the top, use a tool to pull up the edges to solder nice and flat.

Cap Kit Assembly
Clamp and solder the open cylinder (cap bottom) just as you did with the pot body. The bottom piece of the Cap has two lines, a beveled line and an embossed line. Embossed line is under beveled line.

Flux the seams of Cap Top and Bottom; Insert the Cap top on Bottom with beveled line on top, match the seams as these interlock. Get the tightest fit you can, flux seams again and start soldering as you did with the pot.Make Two runs of solder inside the cap pieces (you can always do a small solder line on the outside for added security).Included is a flat square of copper, this is your Cap Tip Top; you can cut this into a circle to fit the cap top.Using the top piece of the cap as a guide, draw a circle with marker on the inside to make a stencil of the right size.

Cut the circle shape, leaving about a 1/8” extra when you cut, this will help make sure the circle you cut is not too small for the cap. Fit the circle into the top of Cap Kit, use something inside to drive the circle up and keep it in place while you solder (any metal cylinder would work).
Flux the seams along circle and solder.
CONE ASSEMBLY
As we saw with the pot body, the Cone also has two sides: a sharp side and a folded over side. The folded over side is always on the outside, covering the sharp edge side.

Flux the sharp side of the seam on the side facing towards you, flux the seam of the folded over side as well, just as we did with the pot.
Match the bottom of cone seams first and when you fold the seams over each other, leave about 2” overhang on the bottom and about ¼” on top to be able to fit the clamps (Don’t clamp the seam, you will be soldering the seam).
Clamp the top and bottom and use a longer handle clamp to clamp the middle of the cone, we do not want any gaps. Close the gap well so the copper sides are touching each other.

Flux and solder from the inside, make sure to fill the gaps well with the solder. Solder in two runs: the first run is to fill the gaps well; the second run is to make it look nice and even.
Wait for the solder to cool, remove clamps.
For this step, you will need an object such as a metal stand, metal object or a 5 gallon bucket lined with tin foil (to prevent melting), this will help you hold the cone into place while you insert the pot body and solder.
Flip cone upside down on the bucket (holder) and fit the pot into the cone and
match up the seams.
Apply pressure to the top of the pot before soldering, to make gaps tighter. (you may want to have another person pushing down to make sure gaps are tight, or you can use a weight as well).

Flux along the seam of Cone and Pot and solder, go slow, in 3” stretches.
Assembly Cap to Cone
Just as we did with the Pot to Cone assembly, attach Cap to small end of cone making sure the seams match (these should interlock).

Have someone help you keeping into place, or have something holding the Cap in place (make sure whatever you use keeps the two pieces steady!)
Flux and solder leaving no gaps. Use low heat, do not overheat and do not force the solder into the seams. Make it so the solder flows naturally and the flame and the flux do all the work.

Worm Assembly
Same process as with the Pot’s Body.
Fit bottom circle onto the worm’s body, flux and solder.
The top circle of worm will have two holes, use a tool to get the top circle up so you can solder in place.
Plugs and Bushings
You’ll need to drill the holes (unless they are already drilled).
It is best to use a step drill bit; make sure you do not over drill the hole, you want the piece to fit snug. Try to use the threads of the piece you are installing to make it fit tight.

When you heat up these pieces, it is different that heating the copper up and soldering! You need to heat up the piece slightly longer before applying the solder. If you apply the solder before the brass piece is hot enough to take the solder, you will end up with solder drips on the copper.

All these pieces will be in the box. The plug and bushing go on the thumper or anywhere you would like to install.
Thumper Pipe Instructions
The seam is on the back side, the drain plug is on the front. Once you de- termine which side is the front and back, you then need to make sure the correct tubing gets installed. The long tubing goes almost all the way down on the left side. The tubing that does not go down much at all goes on the right side.

Plumbing the Unit
Once all of your pieces are ready to get installed, you need to line everything up on the table and get it nice and straight before you solder everything up. We call this “Plumbing the Unit”.
Making sure everything lines up before soldering the pipes is important to ensure that your unit looks proper.
Make sure you apply enough flux to all joints before soldering. Hold the flame on the fitting and heat it up until solder takes. Do not wait too long or the solder won’t take. If this happens, use sand paper or wire brush to clean up and reflux, let it cool down before you try to solder again.

Worm Calibration
The coil for the worm needs to be installed in a manner where the coil spirals downwards.
The coil cannot be spiraling from low to high or down too flat.

Make sure when installing the coil, the flow of the spiral goes downwards to ensure the correct flow needed.

Tips and Tricks
Clamping
* Clamping the copper is important when building a copper moonshine still; the tighter you clamp the copper, the less solder you will have to use and a much stronger bond will be created.
* When clamping, make sure you use the clamps with flat ends which pivot this way you won’t be left with marks on your moonshine still.
* Flux pieces before clamping and before soldering. The flux cleans and prepares the area for maximum adhering capabilities.
Soldering
-
* Flux the pieces generously to ensure proper solder bondings; the solder should “Mend” into the copper.
* Use flux to cool certain spots down if needed.
* Go slow when soldering, do not overheat the flux or copper and let the solder mend naturally with the copper sheet.
-
Make sure you fill all seams with solder. We like to go until it drips out the other end and use gravity to your advantage!
* Always start from the bottom (side close to you) and run the solder up the seams. Put the flame first and follow with the solder, let the copper melt the solder instead of the flame.
* Solder in Two Runs. First run is meant for the solder go into the seams. Second run is to make it look nice and finished. Flux in between runs, but let it cool off first!
*Before you do a “Second Run”, hold the flame on left hand side of seam and
you’ll see the solder bubble. If there is space for the solder to move, it will move.
*Wrap your clamps with tin foil to avoid solder drippings on your clamps.
Even a 30 gallon still barely takes 2 sheets of copper. Do not be fooled by companies selling severely overpriced copper. The truth is that their prices are high because they don't want your sale, they cant even handle their current work load. We have spent the past 14 years offering high quality distillers at the lowest possible prices and we feel offended that these companies would straight up rip you off like this. Waiting 3 months for a copper still is like giving someone an interest free loan for 3 months. I highly suggest you purchase your copper still from our company. To prove how dedicated we are to your purchase we are now offering a free 1.5 gallon mini still with every purchase over $1000. To claim your offer all you need to do is text 1-603-997-6786 with your invoice number and ask for your free still!!! Do not waste your money with our competitors. Our manufacturing techniques are so far ahead of the game, LIGHTYEARS ahead. Do not be fooled into thinking a high priced copper still means high quality. Look at their warranty!!! We are the only company who has offered a lifetime warranty and stood behind it, since day 1.
CHECK OUT OUR MOONSHINE KITS FOR SALE
Shipping
Free Shipping to Continental USA. Worldwide Shipping Available.
Delivery
🚀 Prime Shipping: 10 Day Promise
We’re redefining speed and efficiency! Thanks to cutting-edge improvements at our facility, your orders now ship faster than ever.
⏱️ Here’s Our Promise.
- Every order ships within 10 Days.
- We’ve got you covered with an automatic refund If it doesn’t.
⚡ It’s simple. It’s fast. It’s the future.
10 Days to Ship – Guaranteed.
Why wait? Shop now and experience tomorrow’s standards, today.
Let’s talk about your first or last Made In America Copper Moonshine Still.
Call Us OR TEXT US 24/7
Call the Owner - 1-603-997-6786
Call Sales Line -1-502-337-3944
HOW TO BUILD A 60 GALLON MOONSHINE STILL FROM A KIT
Please check out the complete description of each of our sizes on our websites. For example if you are interested in a 6 gallon DIY Kit and are wondering the measurements of a 6 gallon Moonshine Still you can check out our listing on any of our websites to see the specific measurements and specifications of the 6 gallon unit.

This listing is for a 60 gallon YOU SOLDER kit. It comes with enough solder, flux and materials to finish a beautiful 60 gallon complete moonshine still pot thumper worm and cap the thumper and worm are upgraded and have the two hose hook ups on the worm. Extra Large 15 gallon thumper and 15 gallon worm.
Let’s talk about your first or last Made In America Copper Moonshine Still.
Call Us OR TEXT US 24/7
Call the Owner - 1-603-997-6786
Call Sales Line -1-502-337-3944
_______________________________________________________________________________________
Help Support American Business
🚀 Prime Shipping: 10 Day Promise
We’re redefining speed and efficiency! Thanks to cutting-edge improvements at our facility, your orders now ship faster than ever.
⏱️ Here’s Our Promise.
- Every order ships within 10 Days.
- We’ve got you covered with an automatic refund If it doesn’t.
⚡ It’s simple. It’s fast. It’s the future.
10 Days to Ship – Guaranteed.
Why wait? Shop now and experience tomorrow’s standards, today.